Wednesday, October 21, 2009

Notes on the Ravioli

In the last post, I included a recipe for ravioli. I noticed that I didn't say anything about what to stuff it with. As most of you know, I can't have dairy products, so I went with a chicken filling. I simply pan fried a couple of chicken tenders, added some salt, pepper, bread crumbs, and shaky cheese. ( For those of you that aren't familiar with the term "shaky cheese" it is Kraft parmesan that you get on the international foods aisle. It is a powdery substance that once, in a past life, vaguely resembled cheese.) I also added a little bit of chicken stock for moisture and to make it a little bit like a paste. I didn't have any eggs, so I was improvising.
I am planning on trying a pork filling for them, but it will have to wait until I get the okay from my doctor to stop being an invalid.....
I also wanted to mention that when you make the ravioli, since it is a really easy process, make some extra. Then put them on a plate, in a single layer, overnight to dry and freeze. Then just pop them into a zip top freezer bag and when you need a quick and easy dinner, you have home made ravioli waiting to go! Just cook them the same way you would fresh, it will just take another minute or two, due to the fact that they are frozen. That is what we had for dinner last night, and I must say they were fabulous!!! Just as good as fresh!
Last night I was watching Next Iron Chef, and one of the groups had to learn to make Chinese dumplings. When I get better, that is my next project, those looked so stinkin' good! Also, if anyone is looking for ideas for a Christmas present for me, I would love a steamer. For now, I think I can figure out how to rig one up. I will be sure to post pictures because I have a feeling it is bound to be interesting......

xoxoxoxoxoxox

Sunday, October 11, 2009

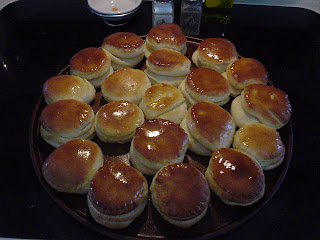
Quick Rolls and Ravioli


Ok, so I know that I said that I would post recipes as well as pictures and tips on my blog and I have yet to share any recipes. Today I am going to change that. Let's start with my Quick Rolls. I found this recipe in with some that I got from Gramma Jean. I was going through all the books, binders, and loose cards that I inherited and this one caught my eye, seeing as you don't usually see a recipe with yeast in it and the word quick in the title. So I decided to try it. This is a more or less fool-proof recipe, the only thing I don't recommend is rerolling the scraps and cutting more. They come out more like hockey pucks than rolls, so unless you have a hockey game later in the day and have yet to locate your puck, just toss the scraps. So without further ado...

Gramma Jean's Quick Rolls

Ingredients:
1 cup warm water
2 yeast cakes (this is 2 1/2 tsp. I know that sounds like a lot, but I tried it with less and it didn't work.)
1 cup scalded milk
4 Tbsp. sugar
2 beaten eggs
1 tsp. salt
6 cups flour
1 Stick melted butter, or margarine
Directions:
In a large bowl, (I use the bowl on my Kitchen Aid, seeing as everything ends up in there anyhow.) Let the yeast start to foam and activate in the warm water. while that is working, start scalding the milk in a saucepan over medium/low heat. Add the salt and sugar to the milk while it is heating, (I found that this helps it all dissolve and the flavor is more consistent throughout.) Once the milk is scalded, temper the eggs by cracking them into a large bowl and SLOWLY adding the milk and whisking continually, if you add the milk you will end up with exceptionally nice scrambled eggs. If this does happen, don't worry, it doesn't screw up the end result, I am just a stickler for culinary protocol.
Once you have the egg/milk mixture ready, add to the yeast in the bowl and attach the dough hook on your mixer and start mixing on low. Slowly add the flour about a cup at a time, depending on the weather you may need to add a little more flour to your dough. Once you have a smooth and elastic dough, it takes anywhere from 6 to 10 minutes with my Kitten, turn out dough on a floured counter.
Roll out your dough pretty much like you would a pie crust. Once it is to about 1/4 inch thick, use a pastry brush to spread the melted butter onto the dough. Fold the dough in half, and roll again to 1/4 inch. Spread with butter again, are you starting to see a pattern? Do this a total of 4 times.
Cut your dough with a round cutter, I have been known to use a glass, and place in pan. Let rise in a warm place for 1 1/2 to 2 hours.
Bake at 450 degrees for 10 minutes. When they come out, brush with butter and enjoy the yeasty layers of goodness!!

On Friday I was watching Food Network, shocking I know, and Giada made this really easy and fabulous looking ravioli. I thought 'I could do that' So I did. they turned out pretty tasty. Still needs a little work, but definately has potential to be fabulous. I will share the recipe now with the changes I think it needs and as I find out which ones did the trick I will be sure to post about it again, or if any of you have any fantabulous ideas please let me know.


Ravioli Pasta

Ingredients:
2 1/2 cups flour (I think it only needs 2 cups as my pasta was dry, but it has been kind of cold and dry in the past few days and pasta is very tempermental depending on the weather. It isn't so much a recipe as it is a method.)
1 cup boiling water
Directions:
On the show, they brought the dough together in a bowl with a spoon and then her hands, I am not overly good at that so I would do it in the Mix Master with a dough hook. Once the dough comes together, let it rest for 10 to 15 minutes to hydrate and develop some gluten.
Once the dough has rested, roll it out to about 1/4 inch thick. If you have a ravioli press, just go from here. If not, place about 1 tsp filling every 2 inches or so. fold the dough over the filling, and cut with a ravioli cutter.
Place in boiling salted water until they float, it should only take 3 to 5 minutes. I like to toss them with marinara sauce and mom likes mozzarella on hers.

I hope you all like these recipes!!!

xoxoxox


Friday, October 9, 2009

Awesome New Magazine

Ok, so I know that in my last post I mentioned that I had recieved my first copy of Cook's Illustrated Magazine. I really only had time to glance through it since I had to get ready to go to dinner. Well, after I got ready, I had plenty of time to read through it, seeing as I was waiting for my dad.
This is truly the coolest magazine I have ever read! Like most cooking magazines it has a Q&A section, I am always interested in these, but I usually know the answer and am stuck wondering where the idiot that asked has been for the last 10 years. But I was pleasnatly surprized to find that I only knew the answer to one of the questions out of seven!! The one that I found the most interesting was about preheating a pizza stone before you use it. I had never even heard of doing that, I figured that if you got it up to 350 degrees, without anything on it, that it would crack. I have had one snap in half before and it is a very depressing experience. Dark day in Kami's Kitchen. But according to this, if you preheat your stone in the oven for one full hour the nyou will get really tender and aity crust. Who knew?
There was also an article about achieveing the very best Old Fashioned Stuffed Turkey. Now I'm personally not big on making my stuffing inside of the turkey, I think it leaves far too many openings for disaster and I hate setting myself up for a bad day of cooking. But this also talks about some of the other problems faced when making turkey, getting crisp skin but not ending up with breast meat that is better suited as sand paper, how you can solve the sandpaper problem by brining but then you end up with rubbery skin, I had never realized that my week long pickling might be contributing to the not rendered rubbery skin problem. But then I don't like the skin, so I was just pleased with moist meat. This also says to roast it with the breast down and salt pork laid across the back.
Needless to say I can't wait to start doing some Pre-Thanksgiving testing to find the best way possible to make our bird. As I test things I will be sure to post what I tested and what my results are.
The rest of the articles were super interesting too. Even the one about making really good roasted potatoes, now everyone know how I LOATH POTATOES ENTIRELY, but things like that are always good to know when you are a caterer. Because unfortunately, most of the rest of the foodie world loves potatoes. There was an article about knives and what kind are good, best and worst. The highest rated knife that didn't cost a zillion dollars was the Forschner 8 inch chef's knife. Why, yes, that is the knife that I use!! Oh yeah!!
In other news, today I pre-ordered Michael Symon's Live to Cook cookbook and am sooooooo excited for it to get here. Unfortunately it doesn't come out until November 3rd, so I will have to wait a while.....
This weekend I am trying Dry Brining, I have never done this before, so I will post how it goes and if it turns out nicely I will add the recipe.

xoxoxo

Wednesday, October 7, 2009

Apple Muffins and Cook's Illustrated


Today I made muffins in the freakin' awesome new pan that Ross and Kelly got me for my birthday. It makes square muffins!! How cool is that?
Anyway, I started thinking about how to take advantage of the fun squared sides of the pan, and I thought that it would be perfect for lining with something and then putting the batter in the middle. That way when it cooks, whatever I had lined the pan with would be the outside layer of my muffin.
Really good idea, although the execution still needs some work. I decided to line the edges with apple slices and then I made an Apple Cinnamon Muffin batter to go in the middle. I am still looking for a really good muffin batter, because the ones that I always seem to find are either WAY TOO dense, or much too sweet for my taste. I think this one would have been a little better with brown sugar as opposed to white because the molasses gives it a little bit of a savory background. Also, next time I think I would go with green apples, not red. The green would have added a little bit of tart acidity to cut some of the sweet.

In other news, for my birthday I also got a subscription to Cook's Illustrated from Ryan and Amy. Today the first edition came!! It is a really fun magazine. They explain the science behind what I do, which is awesome because I like to know why it works, not just that it does. And they test different products and give their reviews as to why or why not they would recommend them. This, for me is an awesome feature. Like in this one they tested different brands of Cinnamon, and there is nothing worse than buying the crappy one and then being stuck with this HUGE bottle of sucky cinnamon.


So I hope everyone enjoyed my first actual cooking post, and as soon as I find a muffin recipe that I like, I will be sure to post it. I also have another recipe that I am in the middle of perfecting for that pan, and once I work out the kinks, you will be the first to know....

xoxoxoxo


Tuesday, October 6, 2009

My New Blog

Hello Everyone!!

This is my new blog! I know that everyone is always asking for my recipes and that I am truly dismal at remembering to give them out. So I am going to start posting recipes and pictures of some of the stuff that I do, but not everything. I couldn't call my Chicken Parmesan 'super secret' if I posted the recipe on my blog!!

So I hope everyone will enjoy this!!

xoxoxo